Raiding Guides


SWTOR Orbital Core Boss Fight Guide

The Orbital Core marks the culmination of Dantooine's new Wreckage on Dantooine progression system introduced in Star Wars: The Old Republic Game Update 7.8 - a long term piece of content that asks players to work together to battle the Glacial, Spore, and Geothermal specific biome dynamic encounters, which scalebased on the number of participating players. Each biome must be pushed to 100% to a Max Level 3, spawning its own world boss at each milestone in order to align the Orbital Core: a tightly tuned 4-man Master Mode challenge intended for well-prepared, reputation-boosted teams. This guide breaks down the mechanics, roles, and optimal group setup needed to take on SWTOR's newest high-end encounter.
Thank you very much to the members of <clean>, especially Conner, Power Piauli and Cogesh for their exceptional patience and help with writing this guide, as well as Sinrai for the extra information added!

Recommended Group Setup
Tank

- Juggernaut / Guardian
- Good damage output, but also takes more damage.

- Powertech / Vanguard (Highly recommended)
- Good damage output along with better defences.
Healer

- Mercenary / Commando (Highly recommended)
- Good burst healer and best off DPS.

- Sorcerer / Sage
- Good heal and absorb, with good defences against mines.
DPS

- Mercenary Innovative Ordnance / Commando Assault Specialist +
Sniper Engineer / Gunslinger Saboteur
- Mercenary Innovative Ordnance / Commando Assault Specialist +
Marauder Annihilation / Sentinel Watchman
- Sniper Engineer / Gunslinger Saboteur +
Powertech Pyrotech / Vanguard Plasmatech
All good damage dealers with good defences against the mines.
Stims & Buffs
The following is as an outlook to farm the Orbital Core 25 times in the easiest and fastest way, researched and calculated by Sinrai from the Cheevo Hunters discord server, and will be of great support for the Core fight as a general:
- 1. Flagship: Orbital Support (infinite)
A guild flagship can be moved to the Dantooine Crash Site Outpost and Orbital Support can be activated with a Invasion Force.
This will result in the following buffs to all guild members on that planet:- +5% Max Health
- +5% Damage Done
- +5% Healing Done
- +5% Damage Reduction
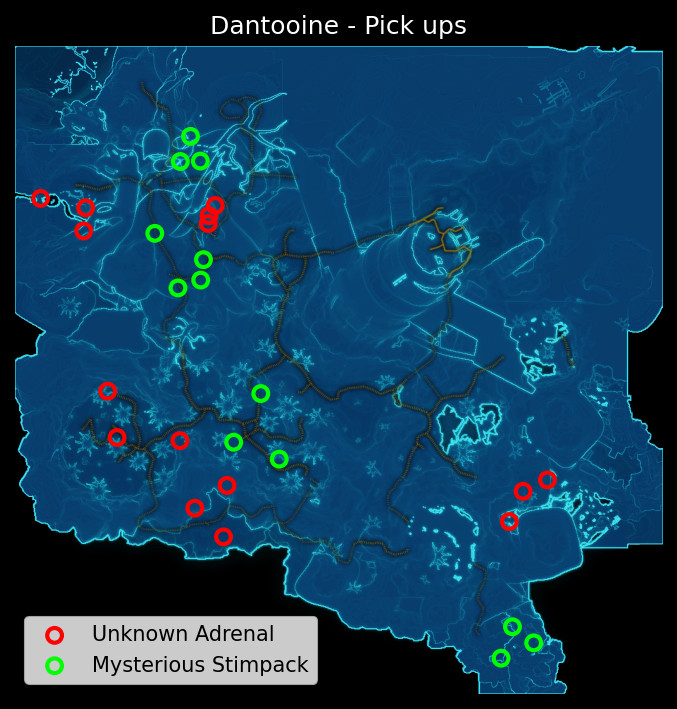
- 2. Rare Buffs to pick up in the biomes
There are 2 different buffs that you can pick up around the biomes that will give a big boost to either offense or defence.
At most there can only be 5 possible pickups per instance and the respawn timer is quite long (~1h).
The possible buffs are: - Unknown Adrenal (1h 30 min)
- +10% Crit Chance
- +20% Alacrity
- Mysterious Stimpack (1h 30 min)
- +5% Endurance
- +30% Defence & Resistance Chance
There are no reputation requirements to pick those up, but the buffs will be removed on death or instance swap.
These are all possible locations. They can be picked up (with the exception for the mysterious stimpack in front of Dr. Spears) by up to 3 players in a group. Only one pickup can be spawned per group. So no need to check all locations.
- 3. Transition Buffs
Biomes level up twice (1-2 and 2-3), depending on which biome is levelled first, there will be different buffs spawning to be picked up on the map. - Geothermal (30 min)
This buff will be located between the Geothermal and Glacial biomes.
There will be clickable"Crystallized Toxin" the will give a buff called "Crystallized Energy".- +10% Critical Chance
- Glacial (50% Chance?) (30 min)
This buff will be located between the Geothermal and Glacial biomes.
There will be clickable "Frozen Vent" the will give a buff called "Volcanic Residue".- +30% Defence & Resistance Chance
- Glacial (50% Chance?) (30 min)
This buff will be located between the Sporefall and Glacial biomes.
There will be clickable "Frozen Flora" the will give a buff called "Benign Spores".- +5% Endurance
- Sporefall (30 min)
This buff will be located between the Sporefall and Glacial biomes.
There will be clickable "Infected Flora" the will give a buff called "Altered Flora".- +20% Alacrity
There are no reputation requirements to pick those up, but the buffs will be removed on death or instance swap.
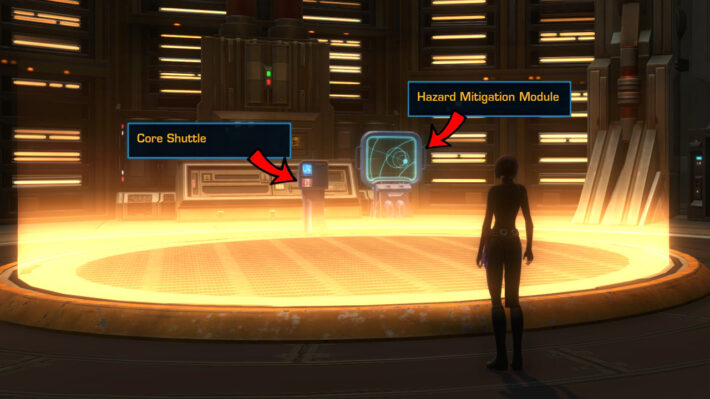
- 4. Hazard Mitigation Module
Before you enter the instance from the Core Shuttle button, you can buy a stim for 200,000 credits to help you in the fight, if you've reached the appropriate Reputation Level. Once they've been acquired, the stims are available for 1h and 30 min, and it will be active for 10 min, which is the approximate length of the Core fight.
- [Friend+] Core Biome Hazard Mitigation:
- Thermal Regulator (30 min)
- -25% dmg from Magma Pool and Magmolated
- Every 30s immunity from being Frozen (Both normal and empowered)
- Hyphal Degeneration Stim (30 min)
- Every 30s immunity from Spores (both normal and empowered)
- Emergency Chemical Purge (30 min)
- Every 30s immunity from Toxic Runoff (both normal and empowered)
- Thermal Regulator (30 min)
- [Heroic+] Preservation Adrenal:
- Regulated Preservation Adrenal (10)
- 1200 Endurance
- 1200 Defence
- +10% Absorb
- Regulated Preservation Adrenal (10)
- [Champion+] Aggression Adrenal:
- Regulated Aggression Adrenal (10min)
- 1200 Critical
- 1200 Alacrity
- 1200 Accuracy
- 1200 Master
- 1200 Power
- Regulated Aggression Adrenal (10min)

A Core to Settle - "Defeat the Orbital Core boss without aid from the Hazard Mitigation Module or other Crash Site buffs. Disqualifying effects are: Regulated Preservation and Aggression Adrenals, Unknown Adrenal, Mysterious Stimpack, Icy Infusion, Weaponized Runoff, and Spore-Spangled."

Empowerment Scale
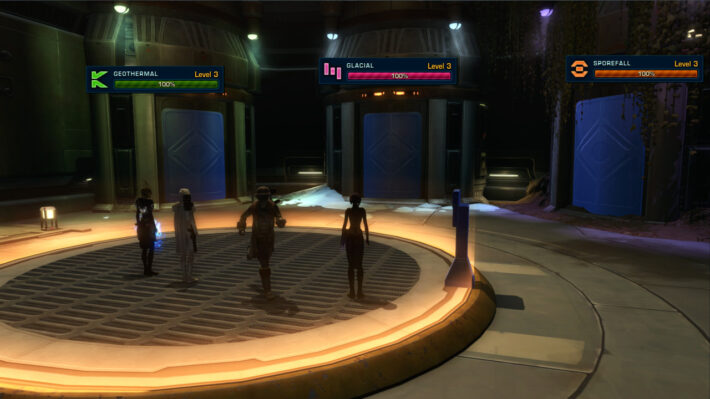
Glacial -> Spore -> Geothermal
Each door leads to a boss that represents a mechanic from the Core - a precursor of what's to come. Each boss has a different effect on the difficulty when engaging the Core itself.
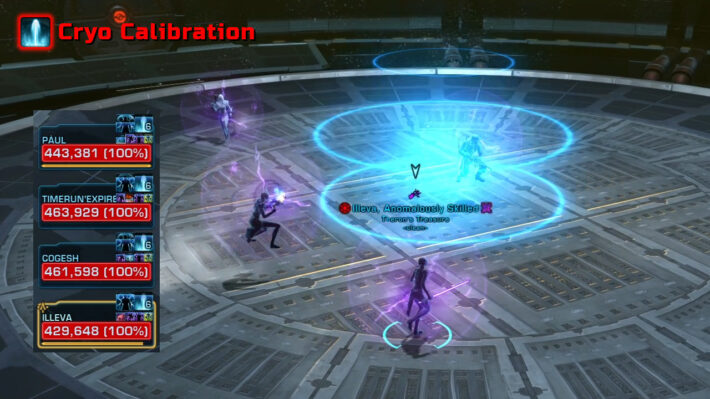
Glacial empowerment is easier because we don't get the Cryo Calibration debuff, so it doesn't affect movement. When all players get frozen, one is free to get fire damage from the lingering Magma Grenade to defreeze others.
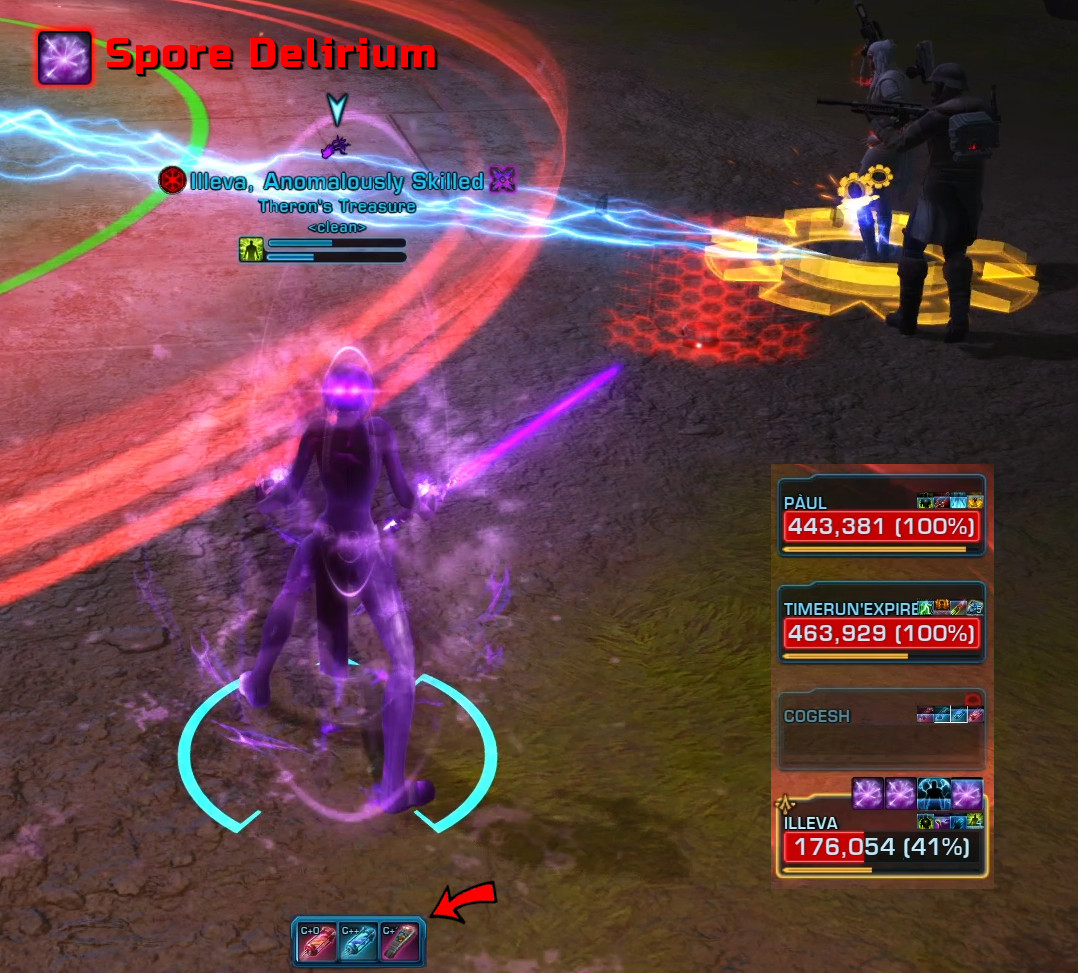
Sporefall is tough due to the big purple circle that will give the Spore Delirium debuff that has to be passed onto another player with a temporary ability. It's more strategic and requires more coordination.
Geothermal is toughest due to the Mining Charges, as well as the Splattering Runoff debuff and the Mining Droid firing a beam through the field. You are dealing with high damage!
Glacial Empowerment

As a precursor boss encounter, the Glacial Preserver is of medium difficulty, but will make for the weakest Empowerment on the Core.
The main three mechanics to deal with are:
- Cryo Calibration
- Debuff that can be mitigated by movement
- Magma Mines
- 2 sets of longterm fire circles, placed around the edges.
- Frozen Solid.
- Group stun debuff that must be removed by the free player.
At the start of the fight, the entire team is hit by a 20s Cryo Calibration debuff, which requires everyone to keep moving to avoid the ticking damage and eventual 10 stacks that will stun you.

At approximately 80%, the boss will cast Magma Grenades onto two players at random. The grenade will follow the player and drop a circle every 1.5s, which is enough time to get to the edge of the arena and drop them in a neat line. This will leave the player with a lingering Magmolated debuff, which ticks damage.
The remaining two players stay in the middle and the Tank will of course face the Magma Blast frontal away from the group.
Once the ticking damage is done, it's recommended to stack up quickly near one of the fire circles.

At approximately 50%, 3 players will get the Frozen Solid and the remaining player must walk into a Magma circle to receive the pulsing Magmolated debuff and bring it to the rest of the group to defreeze them, which should be easy enough if you stack up.
Remember to move away from the group straight away though, as to not keep harming them with the ticking damage.

Sporegenic Empowerment

Although Sporegenic is of medium difficulty as an empowerment, it's actually the easiest precursor boss, even though it's also the one that throws the most mechanics at you.
The main mechanics to deal with here are:
- Spore Expulsion
- 3x casts of expanding circles.
- Horrible Spore
- Debuff of ticking damage.
- Spore Delirium
- Debuff of massive ticking damage, has to be passed onto another.
- Spore-Maddened creatures
- Additional enemies.
- Sporegenic Scouts
- Additional casting enemies.
As you enter the room, the Sporegenic Probe is nowhere to be seen. It will spawn as you walk into the middle and immediately start casting Spore Expulsion. The cast forms as a red circle expanding underneath the Probe, and will increase it's range for every cast until it covers the entire room. If you are caught inside the red circle at the end of the cast, it will damage for a very large amount of HP.

Following the Probe's defeat, 9+ Sporogenic Scouts spawn, including one in the middle, immediately casting Mycelial Burst that will cover all ground.
Simultaneously, all players get their own personal purple circle, that must not be overlapped. Any melee DPS get priority at the middle Scout.
Additionally, two Spore-Maddened creatures spawn alongside all this - Yaracat, Ginx or Makrin.

Kill the middle Scout and let your purple circles burst, and meet in the free space in the center, with a few minutes to spare from the Scout's cast explosions.
The healer has to AOE heal the entire group's ticking Horrible Spores debuff, while the DPS focus on the Spore-Maddened for a bit.

Following the Scout's explosions, another Sporegenic Probe spawns in the center that immediately casts Spore Expulsion, while you're still dealing with the remaining Spore-Maddened creature.
But as the new 9+ Scouts spawn, a single player will be targetted with a large expanding purple circle. This player has to move out of the center and use their Defensives to survive the Scout's explosion.

If it explodes among all players, the entire group will be getting a ticking Even More Horrible Spores debuff that is by all accounts, impossible to heal through.
Note: A skilled Sorcerer / Sage can pull the singled-out player as their circle have exploded, before the Scouts explode, but it is risky! If you pull too early, everyone get's the debuff. (Great suggestion from Sauvraign)
When exploded seperately, the affected player with get two ticking Spore Delirium debuff on top of the health loss and has to be focus healed.
At approximately 25-30% HP, a third debuff will appear and they can pass an the debuff with a temporary ability to another player, who has to go through the same mechanic. Everyone should use their defensive cooldowns as it's passed on to several team mates.
This mechanic can be cheesed by allowing the affected player to die away from the group, get revived and therefore avoid the debuff.
Geothermal Empowerment

The Geothermal empowerment is by far the toughest, both as a precursor and as an empowerment on the Core.
The main mechanics to deal with are:
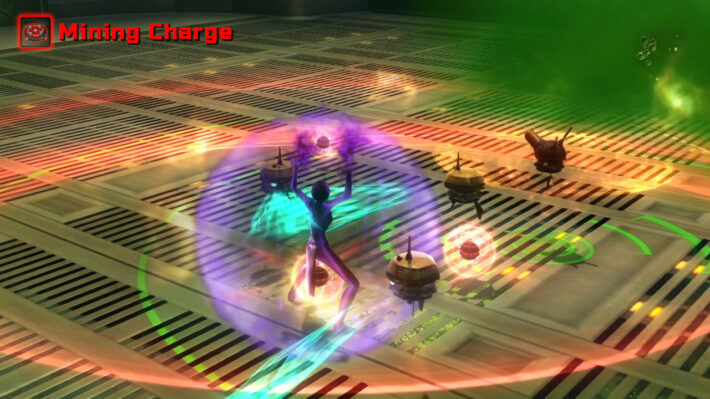
- Mining Charges
- AOE that targets 3 players, mitigated by any skill that grants immunity to movement impairing effects, knockdowns, and physics.
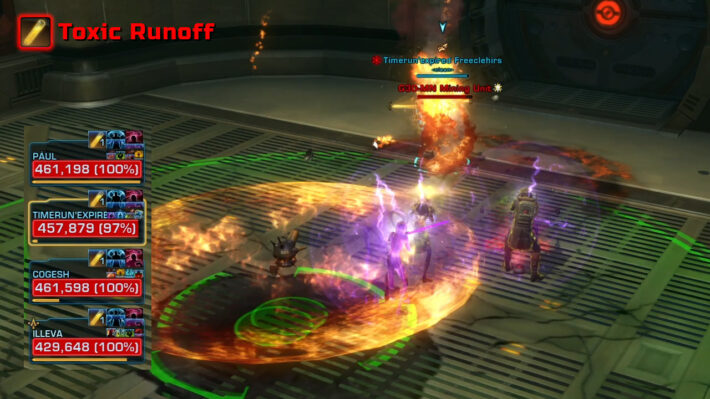
- Toxic Runoff
- Debuff, single target ticking damage from movement.
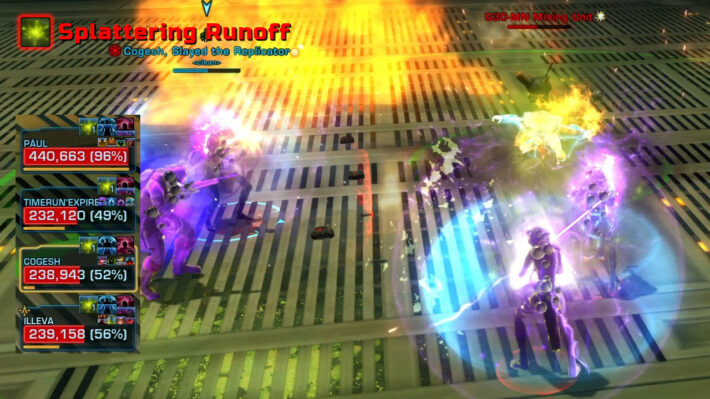
- Splattering Runoff
- Debuff, AOE ticking damage from movement.
- Hazard Shielding
- Reflective buff on boss.
G30-MN Mining Unit stands ready as you enter the toxic-looking room. Shortly after you engage, the entire team will be stunned for one GCD and given 1 stack of Toxic Runoff. This is a stacking debuff that only effects an individual player by ticking damage upon movement.
It's highly recommended that you stack as a group before this happens.
A few moments later, the Mining Unit will cast Mining Charges onto 3 players. Move out of the droppen mines together, leaving one team mate behind, but be mindful of the amount of stacks you gain from Toxic Runoff.
The reason for this is to control the damage they can cause. They will explode after 20s, causing group-wide damage and knock-backs, while taking up a lot of floor space.

The remaining player have to use a defensive cooldown to mitigate against the mines - Hydraulic Override, Camouflage, Entrench or Force Barrier.
At 50% HP, the Toxic Runoff debuff evolves into the Splattering Runoff debuff. This has the same effect as the prior, but now spreads upon movement.
It even more crucial to stack together for the mines whenever there's no debuff present.
While all this is going on, the boss gains a buff called Hazard Shielding. Whenever this buff is active, the boss absorbs 10% damage that he reflects onto the Tank in the form of the Corrode Armor debuff, which can stack up to 25.
To remove the buff from G30-MN, the Tank needs to position him in the firing lane of a Mining Droid that shoots a beam through the room.

The Orbital Core

All three of the precursor bosses - Glacial Preserver, Sporegenic and G30-MN Mining Unit - will be part of the Orbital Core boss fight, but only the one you fought on your way in will be empowered.
The fight is initiated by walking into the obvious red circle in the center of the platform. The first 45s or so, the circle will change colour form red to blue to purple to green, exposing you to the environment damage that is about to occur.
The blue circle will introduce a small knockback and 5-6 stacks of the Cryo Calibration debuff that simply has to be walked off.
The purple circle introduces individual purple circles that can not be overlapped, and subsequently the ticking damage from the Horrible Spore debuff.
The green circle then introduces a stun and 5 stacks of the Toxic Runoff debuff that will tick damage from movement.


Phase 1 - Glacial
As soon as all debuffs run out, the Glacial Preserver will spawn. Just as on the precursor fight, the main mechanics you have to deal with are:
- Cryo Calibrations
- Debuff, mitigated by movement.
- Magma Grenades
- 2 sets of longterm fire circles, placed along the edges.
- Magma Blast
- Frontal cone attack, faced away from the group.
If empowered, the mechanic of defreezing 3 team mates' Frozen Solid debuff with the pulsing Magmolated debuff from the surrounding Magma Grenades is additional.

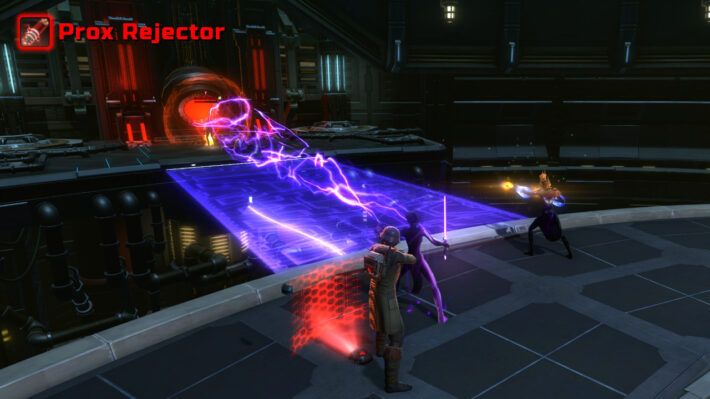
Once defeated, the Core becomes vulnerable to attack. The Core can be damage down to 60% HP before shielding again. Everyone has to work together in interrupting the Prox Rejector cast to avoid damage from the Core.

Phase 2 - Sporegenic
Returning to the platform, the Sporegenic Probe spawns in the center. Just as on the precursor fight, the main mechanics you have to deal with are:
- Spore Expulsion
- 3x casts of expanding circles.
- Horrible Spore
- Debuff of ticking damage.
- Spore-Maddened creatures
- Additional enemies.
- Sporegenic Scouts
- Additional casting enemies.
If empowered, the large purple circle of Spore Delirium debuff causing massive ticking damage that has to be passed onto another player, is additional.

Once defeated, the Core again becomes vulnerable to attack. The Core can be damage down to 20% HP before shielding. And again, everyone has to work together in interrupting the Prox Rejector cast. You also potentially have to deal with remaining Spore-Maddened creatures, that should be brought to the Core for AOE damage.
Phase 3 - Geothermal
Once again, returning to the platform and the G30-MN Mining Unit spawns. Just as on the precursor fight, the main mechanics you have to deal with are:
- Mining Charges
- AOE that targets 3 players, mitigated by any skill that grants immunity to movement impairing effects, knockdowns, and physics.
- Toxic Runoff
- Debuff, single target ticking damage from movement.
- Hazard Shielding
- Reflective buff on boss that is removed by the beam shot through the platform.
If empowered, the Toxic Runoff debuff evolves into the Splattering Runoff debuff that lasts longer and causes ticking AOE damage, in addition.

Phase 4 - Finale
Before you jump to the Core again, you are rudely interrupted by the Damaged versions of all 3 prior bosses! The means you have to deal with the following mechanics:
- Magma Grenade
- 2 sets of longterm fire circles, that can be interrupted!
- Mining Charge
- AOE that targets 3 players, mitigated by any skill that grants immunity to movement impairing effects, knockdowns, and physics.
- Spore Expulsion
- 3x casts of expanding circles, that can be interrupted!
- Hazard Shielding
- Reflective buff on boss that is removed by the beam shot through the platform.
The priority kill order is: Glacial Preserver, G30-MN Mining Unit then Sporegenic Probe.
The Damaged Glacial Preserver is first, because it's the weakest, as well as to eliminate one of the interruptable casts - Magma Grenade.
Secondly, the Damaged G30-MN Mining Unit. It will continously send out Mining Charges and gain the reflective Hazard Shielding buff that can only be removed by positioning it in the firing lane of the Mining Droid's beam.
Lastly, the Damaged Sporegenic Probe is saved for last. It stays in one spot and its Spore Expulsion cast is longer, which gives more manageable room for interrupting the cast.
Note: As of the time of writing this guide, you can keep the Damaged Sporegenic Probe alive for as long as you need. It gives your healer time to heal everyone up and regain energy, as well as letting all your offensive cooldowns become available again.

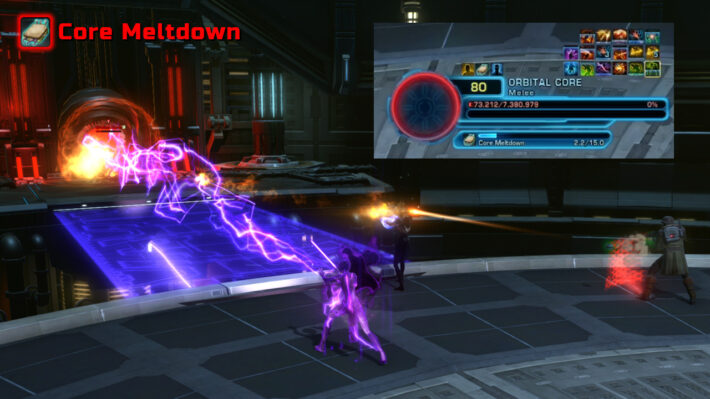
Once the last one is defeated, it's burn time! This is a tight timer of 15 seconds to DPS the last 20% HP before Core Meltdown wipes you out!